This document is meant to ensure proper procedures and guidelines are followed during the start-up of ammonia industrial refrigeration systems. Please note that this procedure may vary based on the type of machinery, location, and duty of each individual ammonia refrigeration system.
For safety purposes, it is assumed that each ammonia refrigeration system has been correctly designed for the duty it is to perform.
Please ensure the following have been checked prior to start-up:

1. An Berg Industrial Service installer will be equipped with the necessary drawings and relevant diagrams, including a refrigeration circuit, flow diagram and electrical circuit diagram for reference.
2. When servicing ammonia refrigeration equipment, the technician should first conference with all personnel responsible for the design and operation of the ammonia refrigeration unit.
3. Prior to charging the system with ammonia, it’s essential to verify that the machinery room on site and any other spaces that contain industrial refrigeration systems are built in accordance to all safety requirements.
4. Before the ammonia refrigeration unit can be charged with ammonia, all first aid and safety equipment must be made available and accessible.
a) Prior to installation, the installation technician must check that the facility is equipped with a proper eye-wash and standard washing station.
b) The facility must also have on site a full facial respirator and protective clothing, including protective gloves, gas masks, and compressed air breathing sets.
c) The items listed above should all be safely and carefully stored in an accessible location so they can be utilized when needed.
Prior to charging an ammonia refrigeration system, local emergency authorities and all on-site staff should be made aware that ammonia is being used at that location. Notices also need to be placed in all relevant locations informing all personnel that the ammonia system will be charged.
Before an technician begins the start-up procedure, check all:
Evaporators and condensers are an example of equipment that may be located outside the machinery room. It’s important to locate these components and ensure all piping and related equipment have been checked as part of a safety inspection.

After visually inspecting all electrical wiring and related supports, the control panel must be inspected inside and outside in order to ensure correct installation and safety procedures have been followed. Fuses and circuit breakers need to be the right fit and correct rating, as shown in the specifications.
Follow these steps:
1. Prior to connecting any part of the electrical supply to the control panel, the ammonia technician needs to oversee an insulation test.
2. After an insulation test is performed, all fuses connected to the main drive motor, pump, and auxiliary equipment will need to be removed. Doing so will allow the control circuit to be energized.
3. Once the control circuit is operating smoothly, each individual circuit will need to be tested to be sure they’re in the correct state in any given situation. Safety devices will need to be manually controlled to ensure they make or break the intended circuits.
4. In order to disconnect the coupling or v-belts from the prime mover and compressor, first ensure all drive fuses are still disconnected, then rotate the machinery manually to make sure it’s revolving freely.
It’s important to estimate the expected current consumption and motor overload settings so that adjustments can be made when needed. When checking the main drive motor, be sure all drive motor fuses have been fitted, rotated electrically, and checked for direction. In some circumstances, you’ll need to bypass certain electrical interlocks to perform the needed tests to run the motor.
If the rotation tests are correct, the motor should be securely isolated. Once all circuit tests have been completed without error, safety cut-out settings will need inspection in order to ensure all values have been set to the necessary specifications.
Once the technician has completed the installation, the ammonia refrigeration system needs to be tested for potential leaks. Visible leaks must be repaired and any defective materials will need to be replaced. Combustible gases, or any mixture of gases, such as oxygen, cannot be used within the vicinity of the ammonia refrigeration equipment during testing.
1. To test the system, dry air or nitrogen will be used to raise the system’s pressure. After all piping has been tested for pressure and insulation has been applied, the ammonia refrigeration system is evacuated with a vacuum pump to remove excess air and moisture.
2. Any pressure switches that do not have vacuum protection should be cordoned off or disconnected. All valves that open to the atmosphere need to be manually opened. Solenoids and control valves that are normally closed should be jacked open or electrically energized.
3. Valves that are air or motor operated need to remain open. All other components which require an oil charge for sealing need to be charged with the specified oil and turned manually. This ensures even distribution and sealing of oil into the intended surfaces.
4. No free-standing water should be left remaining in the system and all measures should be taken to blow out any excess water.
5. To evacuate water from the system, set the ambient temperature to at least 55 degrees fahrenheit or 13 degrees celsius. Connect a fitted vacuum pump to the appropriate valves and evacuate the system until it reaches an absolute pressure of 10,000 microns.
6. Once evacuation reaches 5,000 microns, the vacuum seal can be broken using dry nitrogen, applied just above atmospheric pressure. This evacuation process can be repeated until a 1,500 micron pressure has been achieved.
7. Once the system pressure has reached 1,500 microns, shut off the vacuum pump and allow the system to rest for a 24 hour period. It is important to ensure that a steady state of pressure is maintained over this 24 hour period. This will allow no more than a 1000 micron rise in pressure, assuming that the ambient pressure remains nearly constant.
8. After the evacuation process is complete, the vacuum seal can be broken using gaseous ammonia. To do this, introduce a sufficient amount and subject the system to an ammonia pressure level of 100 psi gauge or 7.03 kg/cm 2 gauge. This translates to 689.5 kpa gauge.
During the process of breaking the vacuum seal, the system needs to be carefully inspected for leaks. Use sulphur tapers or litmus paper to perform these tests. Ammonia masks should always be available during this procedure in case of emergency. If leaks are discovered, they must be repaired. After the final leak-check has been completed, return all electrically-controlled valves to their original operating positions. All controls and valves that were opened during the process of evacuation will also need to be returned to their normal operating state.

All trained ammonia technicians will use the appropriate pressure gauges, thermometers, and any other equipment that will be needed upon start-up or charging of the system. These instruments should first be calibrated for proper accuracy and working order.
Follow these procedure steps:
1. When ammonia is delivered, it often is transported in a large cylinder. During installation or charging, only one of these cylinders should be connected to the system at one time. If it becomes necessary to use more than one cylinder, they should be connected in a way that will prevent the possibility of backfilling.
2. In order to charge the system, the ammonia installer needs to connect a charging line to the ammonia refrigeration system using the appropriate valve. In the absence of the proper valve, the charging can occur via a line which connected to the low-pressure side of the ammonia system. This can only be used if there is no possibility of liquid refrigerant entering the compressor.
3. The ammonia cylinder needs to be located in an open-air location, where there is no risk to personnel or other potential hazards.
4. When ammonia is delivered in bulk, delivery trucks should pump into the receiver via the vehicle’s mounted pumps. This needs to be done with a flexible charging line suitable for transferring ammonia.
5. Due to the compressor working outside its normal limits and temperatures, care needs to be taken to avoid liquid ammonia becoming trapped between isolating valves.
Do not leave the system unattended during charging. Protection devices will need to be tested once the total amount of refrigerant is delivered into the system.
High Pressure Cut-Out
When testing protection devices, the high-pressure cut-out needs to be tested before the low-pressure cut-out. The technician should check the compressors discharge pressure by slowly increasing the pressure at the required setting. If the compressor surpasses the high-level at which the cut-out was intended to operate, the compressor will need to be shut down.
Low-Pressure Cut-Out
To test a low-pressure cut-out, reduce the suction pressure by gradually closing a valve. It is essential for the low-pressure cut-out to run at the required pressure and the suction pressure reaches the minimum required level, as set by the manufacturer. If the low-pressure cut-out fails to perform as required, the compressor will need to be shut down or the suction pressure can be increased by closing the appropriate valve.
Differential Oil Pressure Cut-Out
The oil switch pressure setting will need to be tested, depending on your compressor and the manufacturer’s recommendations. Some oil-pressure cut-outs will have a delay, giving time to reach minimum oil pressure during system start-up. If the oil switch fails to operate during test mode, the oil pressure should be restored to normal values or the compressor should be shut down.
High Pressure Cut-Outs
This test involves immersing relevant ammonia refrigeration equipment into a heated oil bath. This type of high-temperature cut-out is performed by increasing the temperature of the specific parts to test their performance in high pressure.
The trained technician will perform a demonstration run of the ammonia system to test whether it is functioning correctly. During this, the system will be run using the available heat load while the technician records all levels, temperatures and pressures.
When the safety test demonstrates that the demo run has been free of errors, the technician will hand over the installation to the operating staff. From there, they will be responsible for logging pressures, leaks, oil consumption, and temperatures of the ammonia refrigeration unit.
Once hand-over occurs, it is important for operating staff to understand they are also responsible for oil filter changes during start-up and the monitoring of the ammonia refrigeration system for the first few weeks. They will also need to observe components that are located outside the mechanical room, but are still relevant to the ammonia refrigeration equipment.
An technician will hand over all user information regarding the design, maintenance, and working pressure of the system along with all relevant safety guidelines.
This should include:
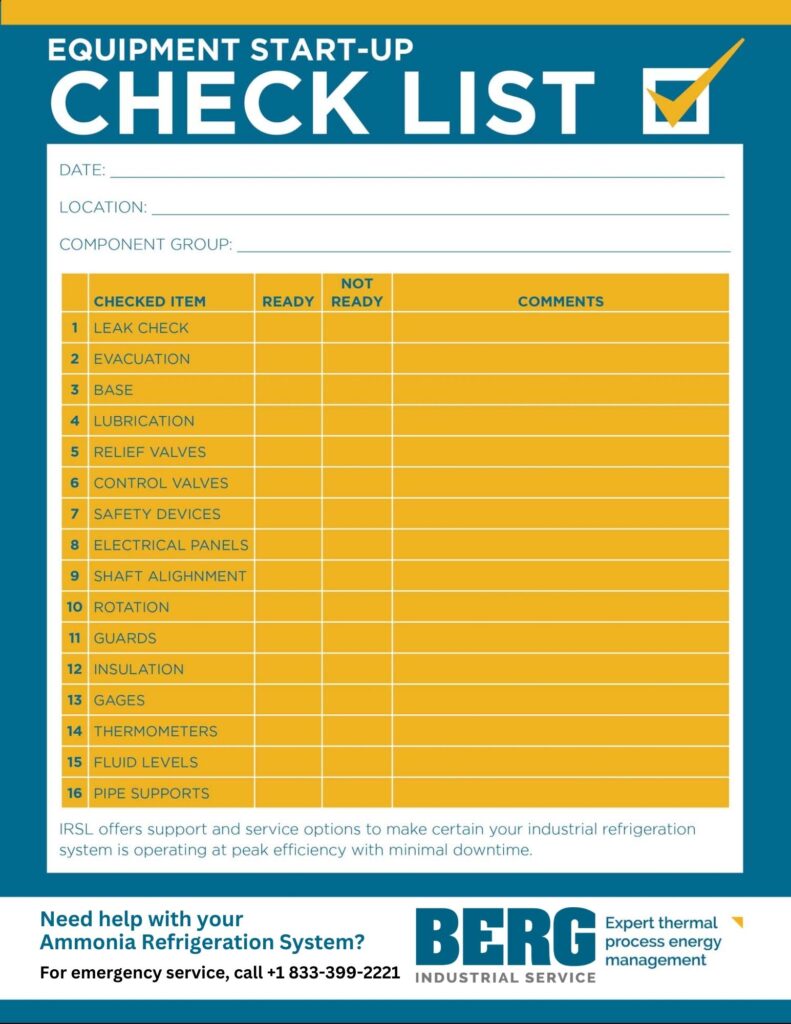
Use this equipment start-up check list for use on your project sites.

For maintenance and repair of all ammonia industrial refrigeration systems, call us today to book a service call. What makes us better than other ammonia refrigeration companies? We are dedicated to providing you, the customer, with the highest quality service for all your cooling needs. That’s why we are backed with over 20 years of service and customer satisfaction. Contact Berg Industrial Service to learn more about ammonia refrigeration.